Visual Editor 2.0
The Visual Editor enables non-technical users to design A/B tests on their site directly in their browser, run them in production, and analyze results, all without writing a single line of code. To use the Visual Editor, you will need to integrate either our JavaScript or ReactJS SDK to your application (requires a developer).
In March 2023, we released version 2.0 of our Visual Editor, which had many improvements.
The Visual Editor may not work optimally on client-side rendered apps (e.g. React.js, Vue.js). Consider using Feature Flags instead for smoother integration. Contact support@growthbook.io if you have any questions.
If you do decide to use a framework like React or Vue, be sure to see our section on SPA support below.
Requirements
To create visual experiments, all you need is the following:
- The GrowthBook Chrome Extension installed on your Chrome Browser.
To run your visual experiments against users in your web app, you additionally need:
- The JavaScript or ReactJS SDK loaded in your web application.
The application you want to experiment on must be a front-end web application viewed in a browser. Our Visual Editor does not work for mobile apps (Native or ReactNative) or desktop apps (e.g. Electron). For unsupported platforms, we recommend using Feature Flags instead to implement your changes in code.
Creating a Visual Experiment
To use the visual editor, first add a new Experiment. This can be done under Analysis -> Experiments
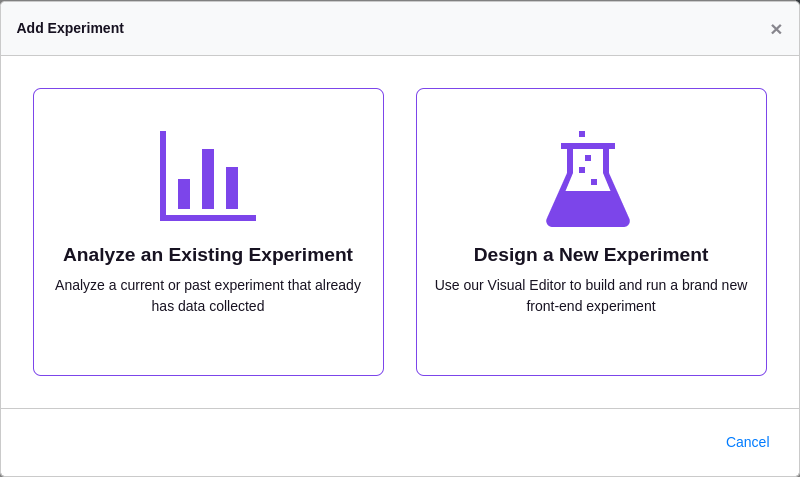
Select the option to design a new experiment. Then, you'll have a series of fields to fill out (hypothesis, variation names, goal metrics, etc.). Don't worry, these can all be changed later.
Once you created an experiment, you should be prompted to open the Visual Editor.
URL Targeting
GrowthBook needs to know what page(s) of your site the experiment should run on.
For URL Targeting to work, you must pass the url targeting attribute into the GrowthBook SDK and also list it in the GrowthBook App.
See Targeting Attributes to learn more about targeting users with certain attributes.
If your experiment is going to be on a single static page, enter the full URL and submit (e.g. https://www.example.com/pricing).
If your experiment is going to be on a page with a dynamic URL (e.g. all pages that start with /post/), click on the "Advanced Mode" link.
You'll need to enter 2 different URLs.
- A single representative URL you want to load in the Visual Editor (e.g.
https://www.example.com/post/my-first-post) - A URL targeting pattern to match all of your dynamic URLs
The targeting pattern supports wildcards (*), so for this example, you could enter /post/*.
We recommend sticking with "Simple" URL targeting rules (don't be fooled by the name, it's actually really powerful). The other option (Regex) can be useful for really advanced use cases, but it is much harder to write and more error prone.
Simple Targeting
Our "simple" URL targeting option supports the vast majority of use cases and is easy to use. It supports the following features:
- Match based on full URLs (e.g.
https://www.example.com/pricing) - Match based on path (e.g.
/pricing) - Match based on query strings (e.g.
/pricing?utm_source=email) - Match based on hashes/anchors (e.g.
/pricing#more-info) - Wildcards (e.g.
/posts/*will match/posts/123AND/posts/2023/03/30/my-post) - Ignores leading and trailing slashes (e.g.
pricing,/pricing, and/pricing/are identical) - Ignores the protocol (e.g.
https://...will also matchhttp://...) - Ignores extra query string parameters (e.g.
/pricing/?plan=prowill match/pricing/?utm_source=email&plan=pro&logged-in=true)
Regex Targeting
Our "regex" URL targeting option supports full regular expressions. Writing regular expressions for URLs is very error prone, so be careful and make sure you escape all special characters you don't want to be interpreted. Here's a full example:
https?:\/\/(www\.)?example\.com\/pricing\/?
You can also match on just the path:
^\/pricing\/(pro|enterprise)
The Visual Editor
There are a number of different tools in the Visual Editor.
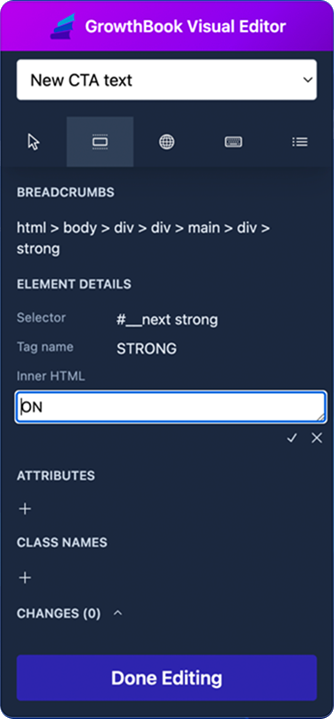
At the top is a dropdown where you can select which variation you are currently editing.
Below that is your toolbar. It has the following tools in order from left to right:
- Interactive Mode - Click around your site normally
- Element Selector - Point and click to select an element on your site to edit. This is the most common way to make changes.
- Global CSS - Inject global CSS styles into the page. Use this to control things like page background color or font size.
- Custom DOM Changes - A low level way to specify changes to elements
- Change List - See a summary of all of the changes you've made to the page so far
When you're using the Element Selector, after you pick an element to edit, you'll be able to modify the Inner HTML (i.e. the copy), any attributes (e.g. a link HREF), and the list of CSS classes.
When you're finished making changes, click the Done Editing button to be taken back to GrowthBook.
Production
Before publishing an A/B test to production you will need to integrate either our JavaScript or ReactJS SDK to your application (requires a developer).
The Visual Editor requires the latest versions of our SDKs. If you've already been using GrowthBook for feature flags, you may need to update your installed version.
SDK Connection
You will need a client key to pass into the SDK. You can get this by creating a new SDK Connection (under Features in the left navigation).
Important: Make sure to enable the "Include Visual Experiments" toggle. If you forget this step, Visual Editor experiments will not be sent to your application.
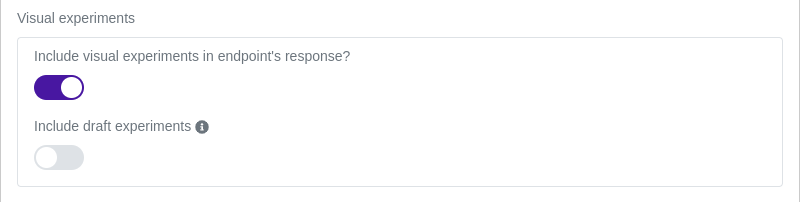
You can also optionally include Draft Experiments. These are not run automatically like Production experiments. Instead, they can be triggered via special URLs (see below for more info). Drafts are useful for QA testing before releasing to your actual users.
SPA Support
If you have a Single Page Application (SPA) that does client-side routing, you'll need to update the URL within the GrowthBook SDK every time it changes.
For example, with Next.js you can do the following:
function updateGrowthBookURL() {
  gb.setURL(window.location.href);
}

export default function MyApp() {
  // Subscribe to route change events and update GrowthBook
  const router = useRouter();
  useEffect(() => {
    router.events.on("routeChangeComplete", updateGrowthBookURL);
    return () => router.events.off("routeChangeComplete", updateGrowthBookURL);
  }, []);

  // ...
}
Drafts and QA
While the experiment is still a draft, you can preview variations by adding a querystring to your URL.
This requires turning on the "Include Drafts" toggle for your SDK Connection in GrowthBook.
To build the QA preview URL, you'll need the Experiment Id (viewable on the right side of the experiment page under Settings). You'll also need the variation number you want to preview. 0 is the control, 1 is the 1st variation, etc..
Now, just join these together with an equals sign (e.g. my-experiment-id=1). This needs to go in the Querystring part of the URL (after a question mark). Here's a full example:
https://www.example.com/pricing?my-experiment-id=1
Until an experiment is moved out of the "draft" phase and started, this is the only way to view it on your site.
Stopping an Experiment
When your experiment is finished, you can click on the Stop Experiment link at the top of results. This will prompt you for several bits of information about why you're stopping and what the conclusion was.
If your variation won, you can optionally enable a Temporary Rollout when stopping. This will continue running your experiment with the same targeting conditions, but send 100% of traffic to the winning variation and disable the trackingCallback from being called.
The reason it's called a "Temporary" Rollout is because you don't want to rely on our SDK to implement the winning variation forever. It's best practice to have your engineering team re-implement the changes directly in your site's code. This is for a number of reasons:
- Changes implemented in code are rendered quicker, so your site will load faster
- Changes in code will be picked up for SEO
- Changes applied through the visual editor require the SDK to download data from GrowthBook. Although lightweight, these stopped experiments can add up over time and further slow down your site.
- Reduce the chance of conflicts. If two visual editor experiments try to change the same element at the same time, it will not always work as expected. Moving the winning variation to code will avoid this issue.
Security Requirements
If your website uses a Content Security Policy (CSP) in its HTTP headers or in a <meta> tag you must include your GrowthBook API Host domain in order to use the Visual Editor.
CSP Requirements for Visual Editor
If you have the connect-src directive defined in your website's CSP, you'll need to include the URL of your GrowthBook API Host in order to allow the Visual Editor to work correctly:
Content-Security-Policy: connect-src <GROWTHBOOK_API_HOST>;
Here is an example of a CSP definition that includes the GrowthBook Cloud API host:
Content-Security-Policy: connect-src https://api.growthbook.io;
CSP Requirements for Global JavaScript
If you have the script-src directive defined in your website's CSP, you'll need to enable 'unsafe-inline' and 'unsafe-eval' in order to leverage the Global JavaScript injection feature of the Visual Editor:
Content-Security-Policy: script-src 'self' 'unsafe-inline' 'unsafe-eval';
Read more about Content Security Policy here.